

The camera situation on the all new HTC One is a little daunting. The M8 has not one, not two, but three camera lenses built in. First, there's the 5 megapixel selfie machine up front, then around back, there's the new Duo Camera with a refined UltraPixel sensor.

HTC has done things differently here, and the UltraPixels and dual lenses means that the M8 doesn't necessarily take pictures like you'd expect—and that's not a bad thing. With a little guidance and some easy tricks, you can use all of this to your advantage and take some truly amazing shots.
Here's a complete rundown on everything happening in the camera app on the all new HTC One (M8).
#1. Using Motion/Gestures to Launch/Switch Cameras
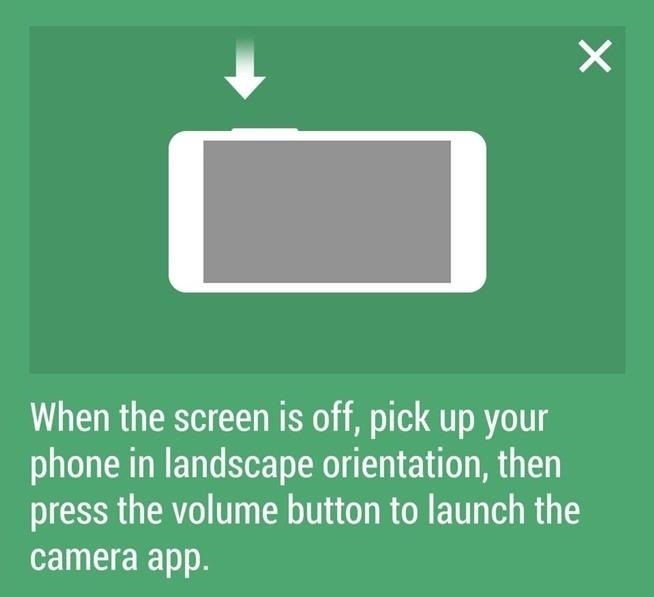
The first thing you should know is that to take a picture, you don't even have to tap on the Camera app. Though it's a little more cumbersome than what you'll find on the Moto X, you can use Motion Launch to get to the Camera quickly, without ever having to touch the Power button.
Simply hold the phone straight up in portrait mode while the screen is off, flip it into landscape mode, then hold in the Volume Down button. You should feel the device vibrate, and it should launch the Camera app. It doesn't work perfectly, and it doesn't work every time, but it's nice when it does.
Another feature at your disposal is a handy gesture that allows you to easily switch back and forth between the front and rear cameras. With the Camera app open, just swipe your finger from either edge of the screen to go back and forth.
#2. Navigating the Camera App's New Interface
The interface in each camera mode is nearly identical, with a few minor differences. In landscape mode, the icon on the right center of the screen will snap a pic or begin video capture. The icon on the top right will be of your most recent pic; tap it to take you to the Gallery.
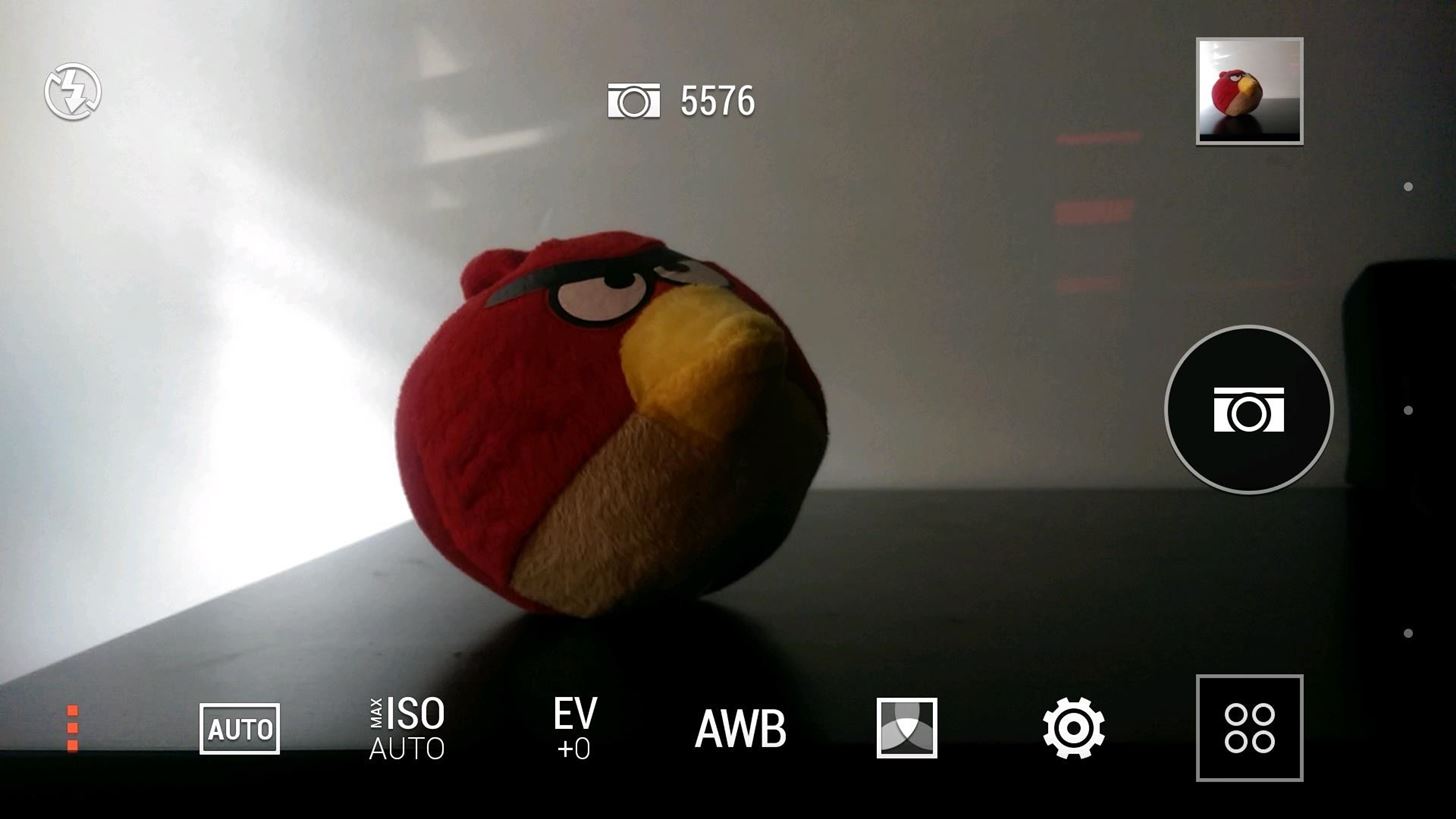
The bottom right icon takes you to the the different shooting modes. The top left toggles flash settings, and the bottom left displays shooting options. All in all, it's pretty straight forward, clearly laid out stuff.
#3. What You Need to Know About Camera Modes
The stock camera app on your M8 comes with six camera modes: Selfie, Camera, Dual Capture, Video, Pan 360, and Zoe Camera. From any mode, tap the icon on the bottom right to switch to a different one.
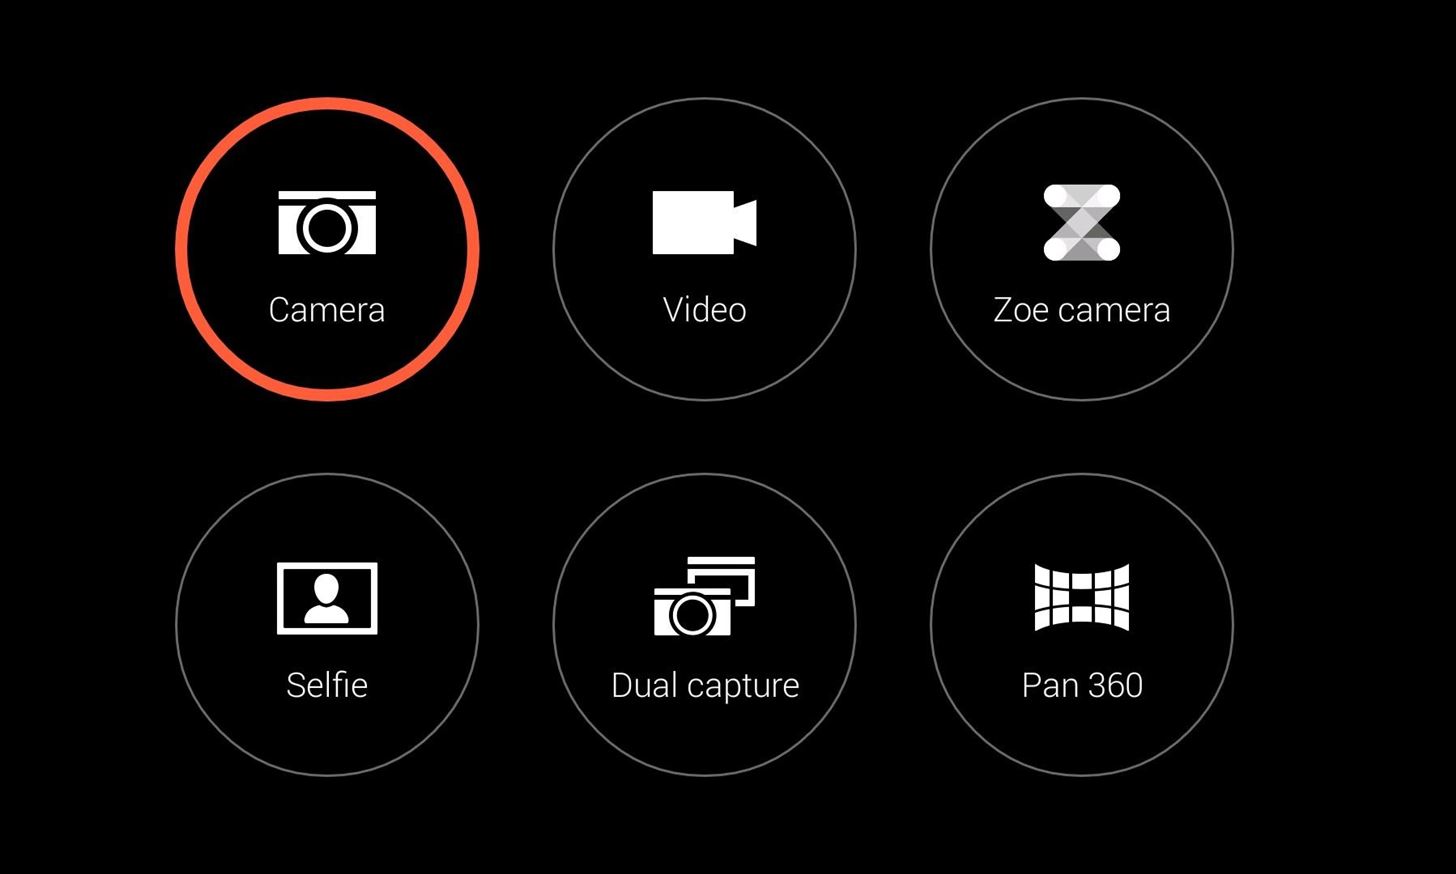
Camera Mode
Tap the camera icon at the bottom to take a picture in camera mode. If you want, that's all you'll ever need to do. The software and lightning fast shutter speed do a pretty good job if you leave everything on auto pilot. You can find some great stuff if you dig deeper though, and I'll expand upon that in the next section.
Selfie Mode
It does what it sounds like and activates the front camera. You can choose to capture an image or a video here. Tap the menu icon on the top left to enable a countdown timer, or adjust a few shooting settings. You'll be fine if you leave everything on auto, since at 5 megapixels, the front facer on the M8 easy bests mostly everything else out there.
Video Mode
Loads up the video camera. There's not much going on here, but there are a few settings you should know about. The menu icon will allow you to adjust ISO, EV, and white balance, or apply filters, while the first icon allows you to change capture modes.
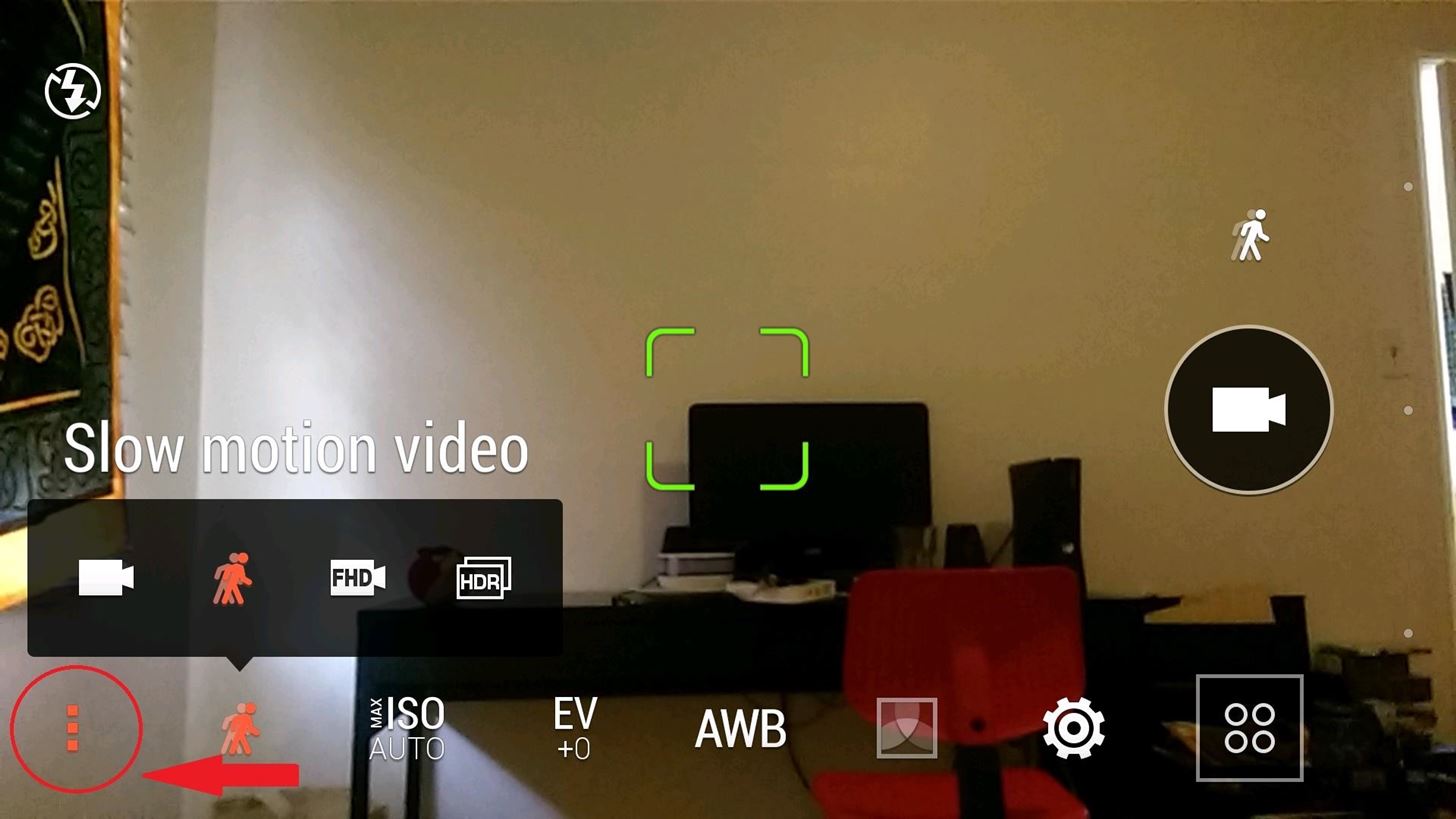
You can change from normal, to slow motion, to 60 frames per second. You can also adjust the video quality in the settings menu, from as low MMS (176 x 144) to as high as Full HD at 1080p.
Dual Capture Mode
This mode lets you take a picture with the front and back facing cameras at the same time. You can drag around the box with the front-facing image or make it a little bigger or smaller. Really, this is to include the photo taker in group shots, or for complete "from where I'm standing" pictures.
Zoe Camera Mode
This is a bit of an odd one because there's not much you can do with it yet. Short for zoetrope, HTC's thinking is that you can use this mode to create moving images. It's not quite video, but they're not quite pics either—it's in between.
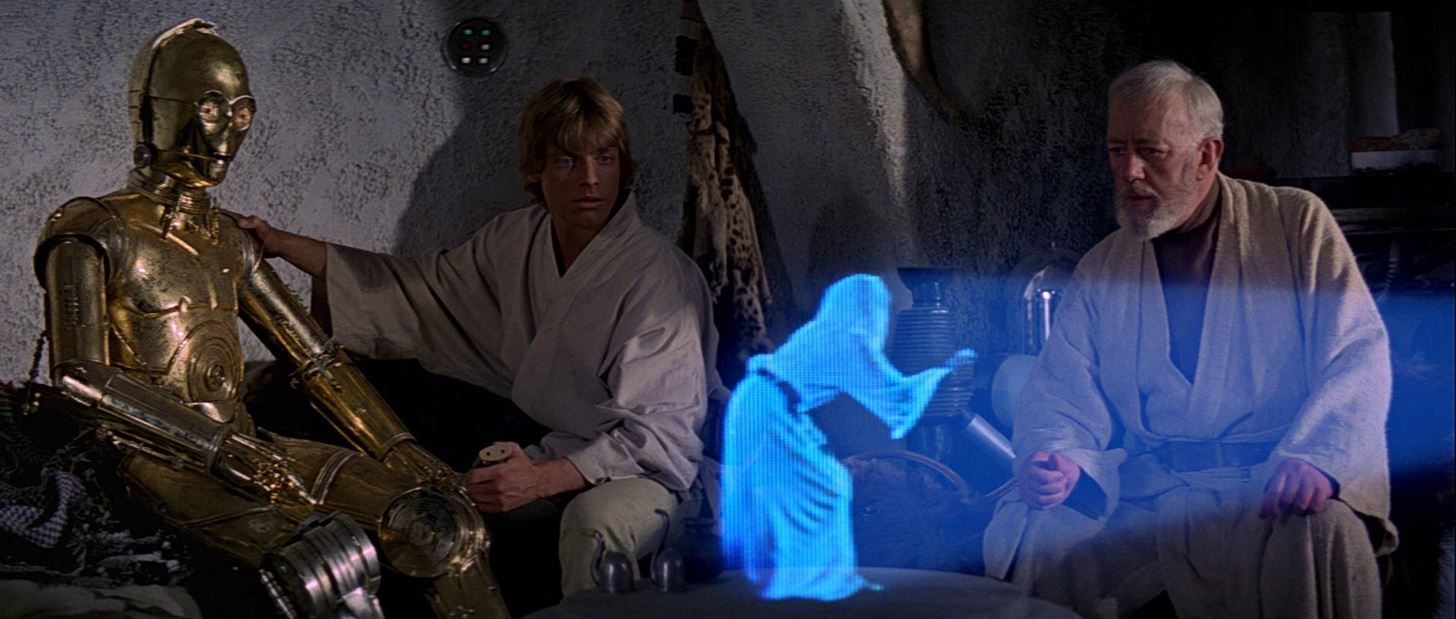
Think of a Sci-Fi movie where a character takes a look at a photo. Often times that photo isn't a static image, but has some movement to it. HTC seems to be going for that Leia-hologram effect, just without the hologram.
Hold down the camera icon to begin recording, and release when you're done. In theory, you'll then be able to use the included Zoe app to edit them, string them together, and create and share cool compilations. Unfortunately, somehow, the app isn't ready yet, and if you open it up, it will tell you as much.
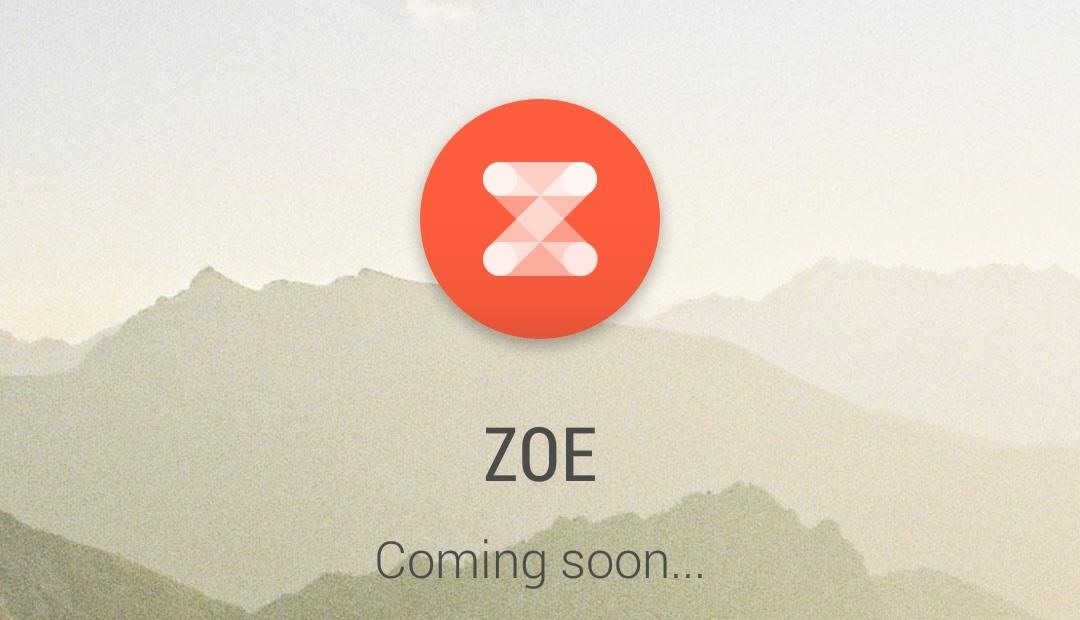
In the meantime, all you can do with Zoes is select a single frame to save as an image, or appreciate how if you take them, they will populate your Gallery with moving images alongside the static ones. Zoes aren't a bad idea, but until HTC gets the app off the ground, which they claim they'll do this summer, you'll have little reason to use them.
Pan 360 Mode
HTC's version of Photo Sphere in Google Camera. It works much the same way—pan the phone around, both vertically and horizontally, to capture a 360 degree scrollable image. It's neat and well implemented.
#4. The New Camera Shooting Settings
Here's the real meat and potatoes. You'll be spending most of your time in the regular old camera mode, and while there are many options for editing images—including the all-new Instagram—HTC has included a metric ton of settings to ensure you get the shot you want. Tap the menu overflow icon on the top left to display a drop down list.
The first icon allows you to switch from auto mode to ten other settings. These are similar to the theme settings you'll find on your point-and-shoot. You can shoot in Night Mode, HDR, Sweep Panorama, Anti-Shake, Manual, Portrait, Landscape, Backlight, Text, or Macro.
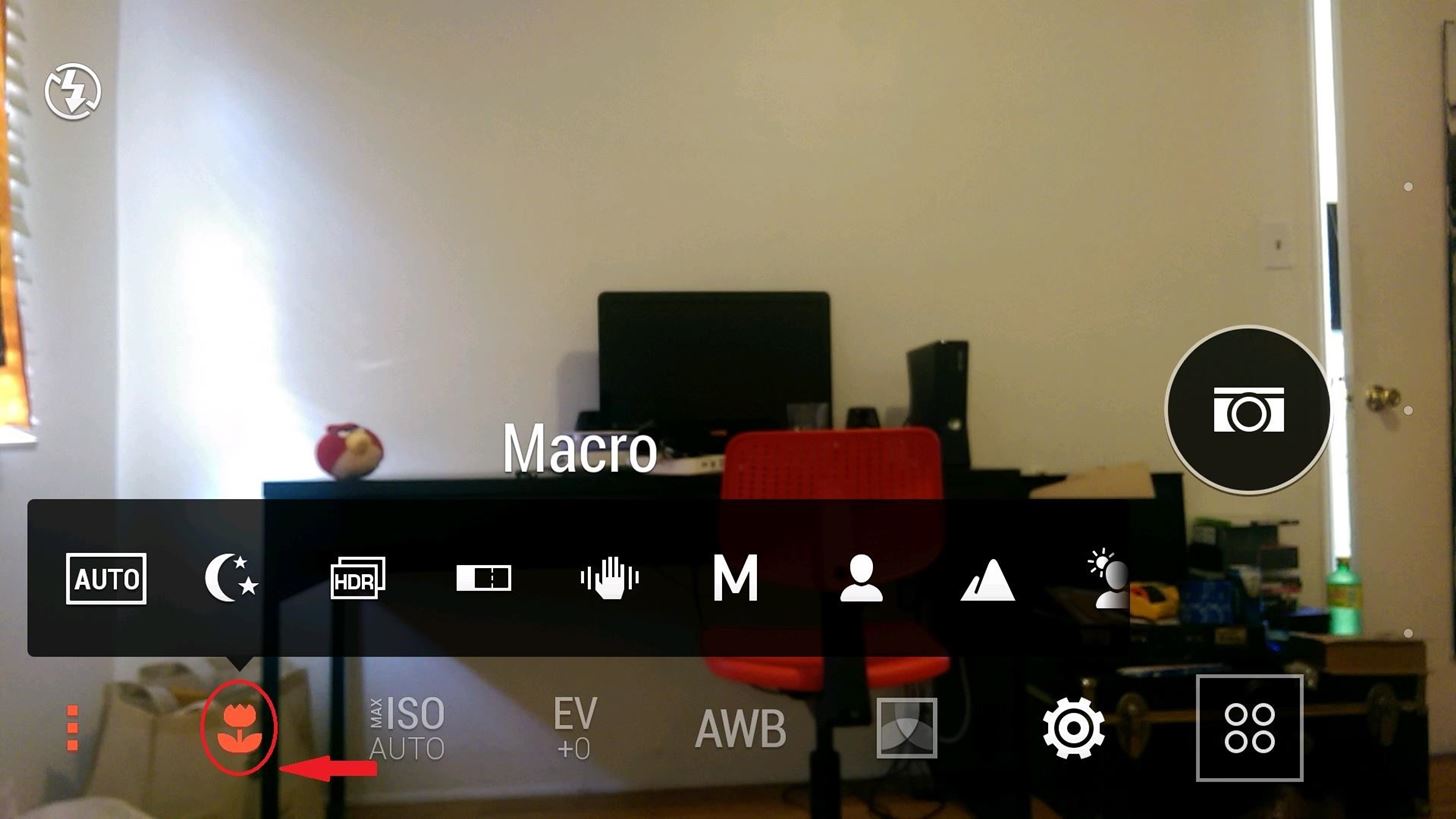
A few stand-outs here are the: Panorama, Macro, and Manual settings. Panorama works beautifully and Macro nails the close-up shots. Meanwhile, Manual gives you an absurd amount of control, with sliders to adjust everything from aperture to shutter speed. If you're at all familiar with SLR photography, you can get really creative with the Manual settings.
You can also change the white balance from auto to four different presets: incandescent, fluorescent, daylight, and cloudy. Filters are available for you to apply before you shoot, but you could always slap those on afterwards in editing.
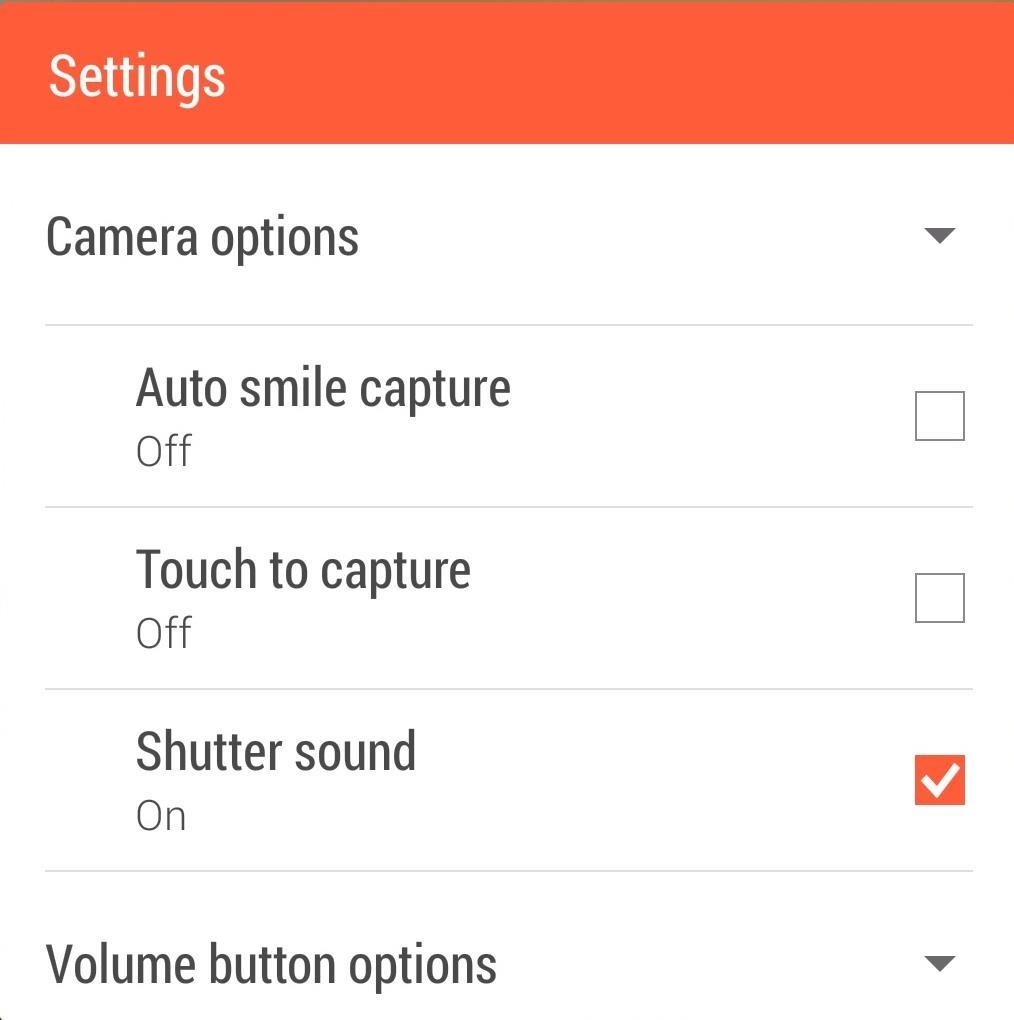
Tapping the gear icon at the bottom of the drop-down list will let you change even more settings. You can switch from 16:9 wide angle shooting to regular 4:3, or square 1:1 for no-crop Instagram shots. You can switch on and off a review duration, grid, geo-tagging, shutter sound, self-timer, touch to capture, continuous shooting, or auto-smile capture (which tries to take a picture when it detects a smile from your subject).
All of these settings are great to have, but don't worry if they seem daunting. Your M8 takes pretty solid photos if you leave everything on auto, though they do come in handy if you feel like you're coming up short.
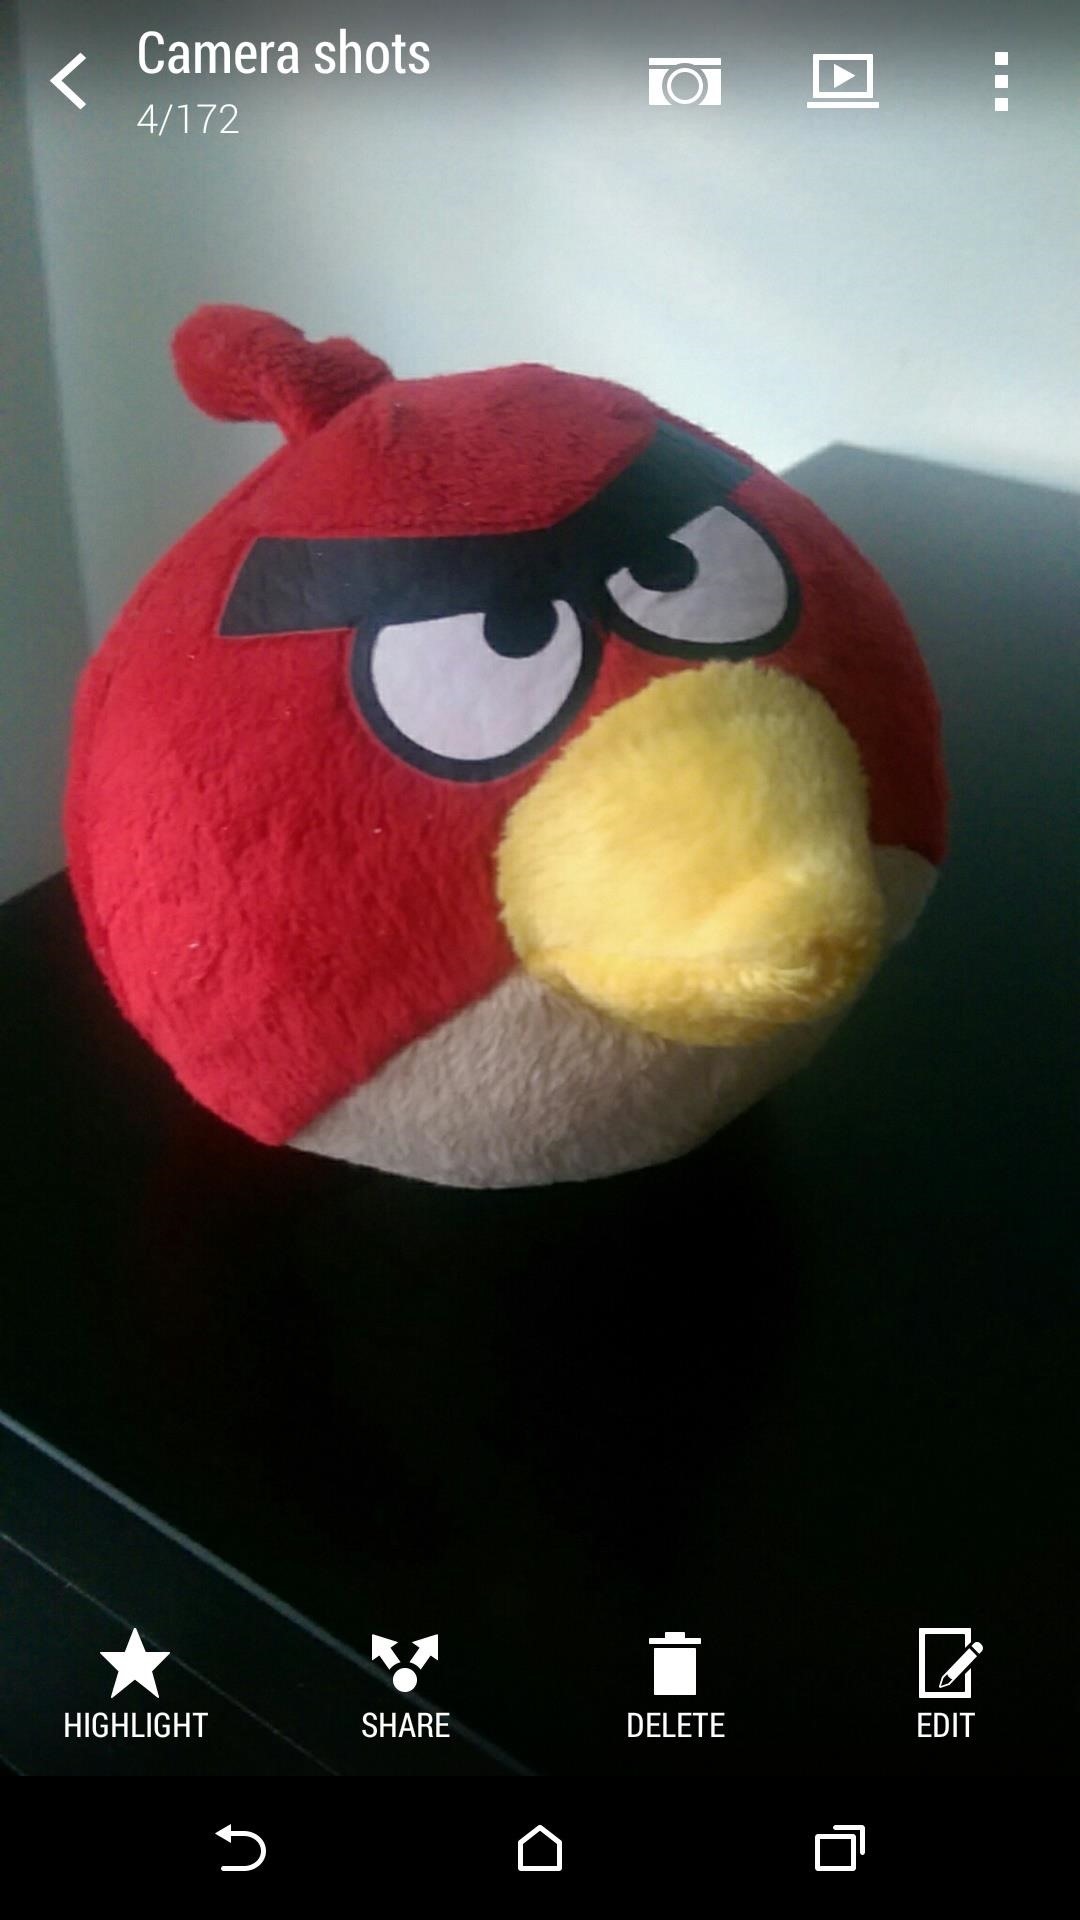
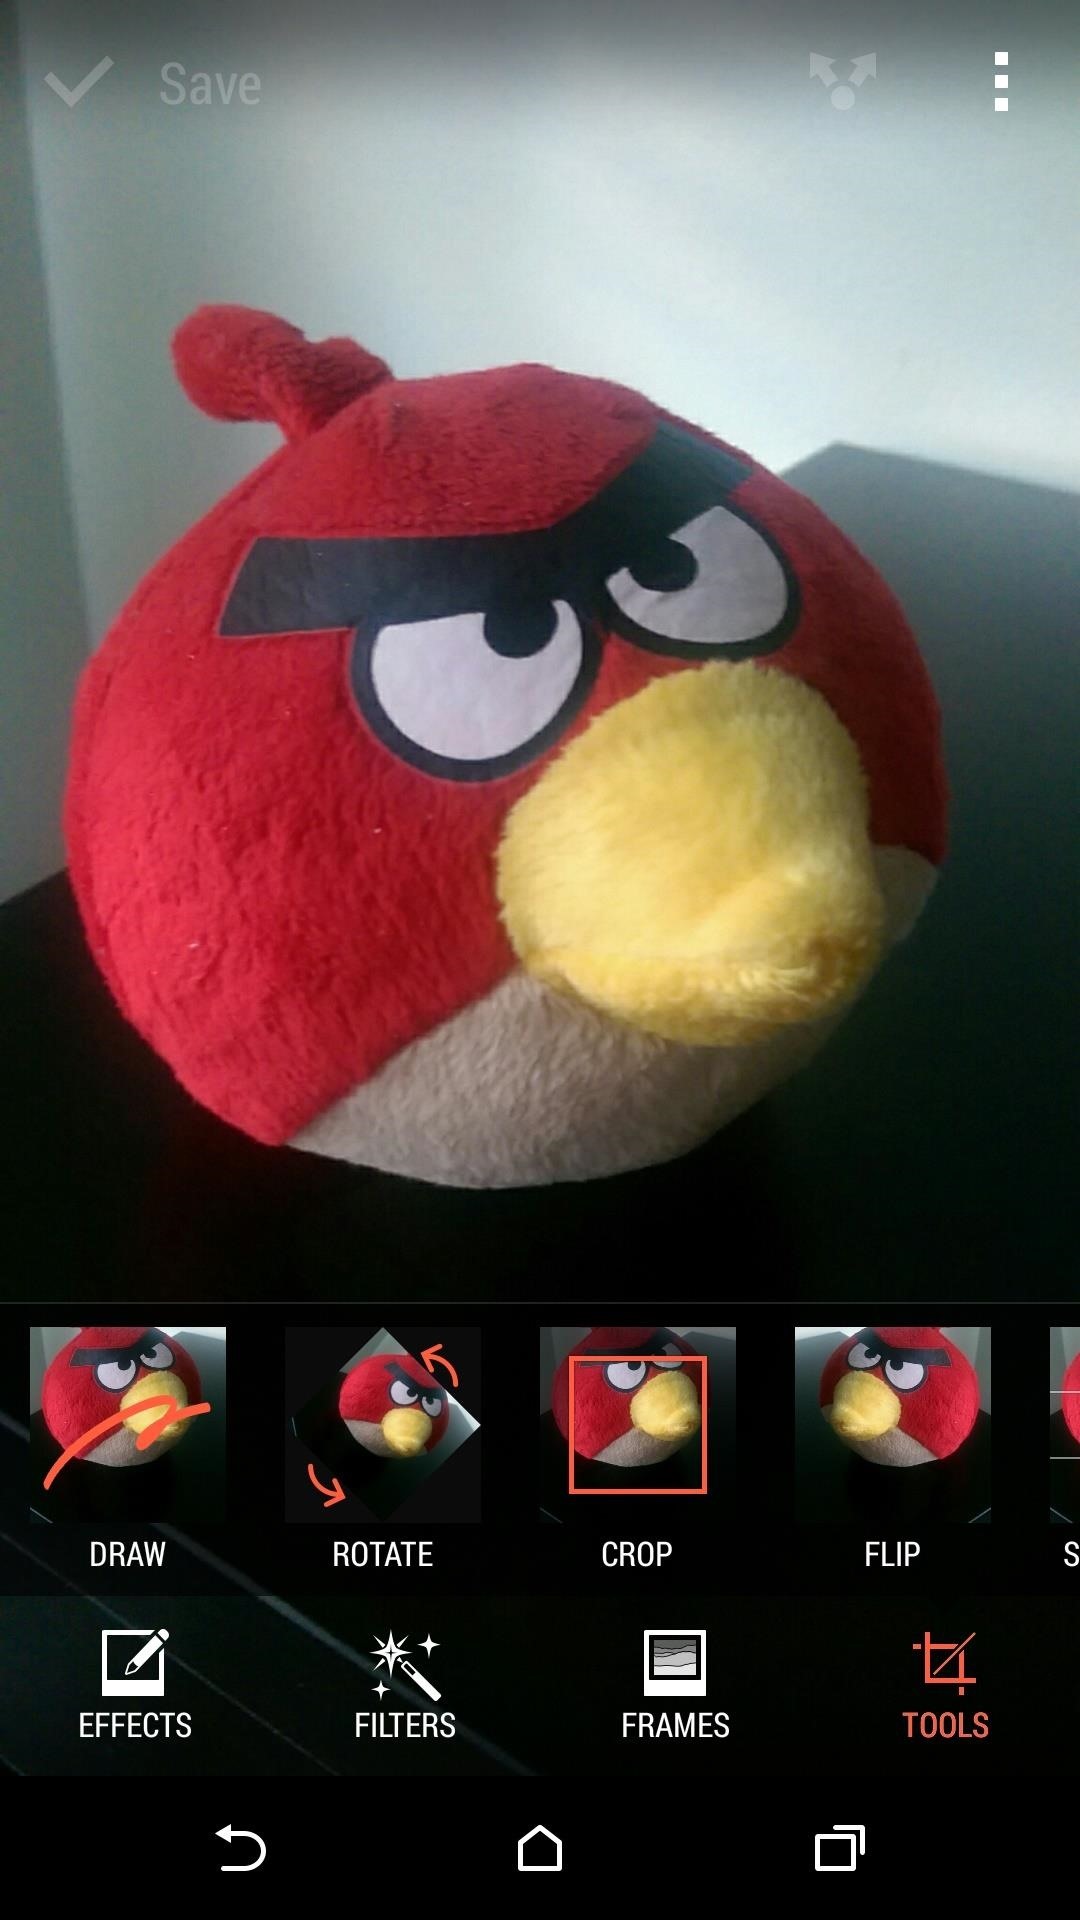
#5. Editing Your Photos
Select any photo, tap edit, and you'll see there are four categories of edits you can make. Filters provides you with about a dozen to choose from with Instagram-like results. The frames are pretty basic, but they're nice if you're into that sort of thing. In tools, you can do rotating, cropping, flipping, straightening, as well as draw on your pic with a variety of tools and colors.
Things get interesting when you go into Effects, so let's break those down.
#6. Duo Camera with UFocus
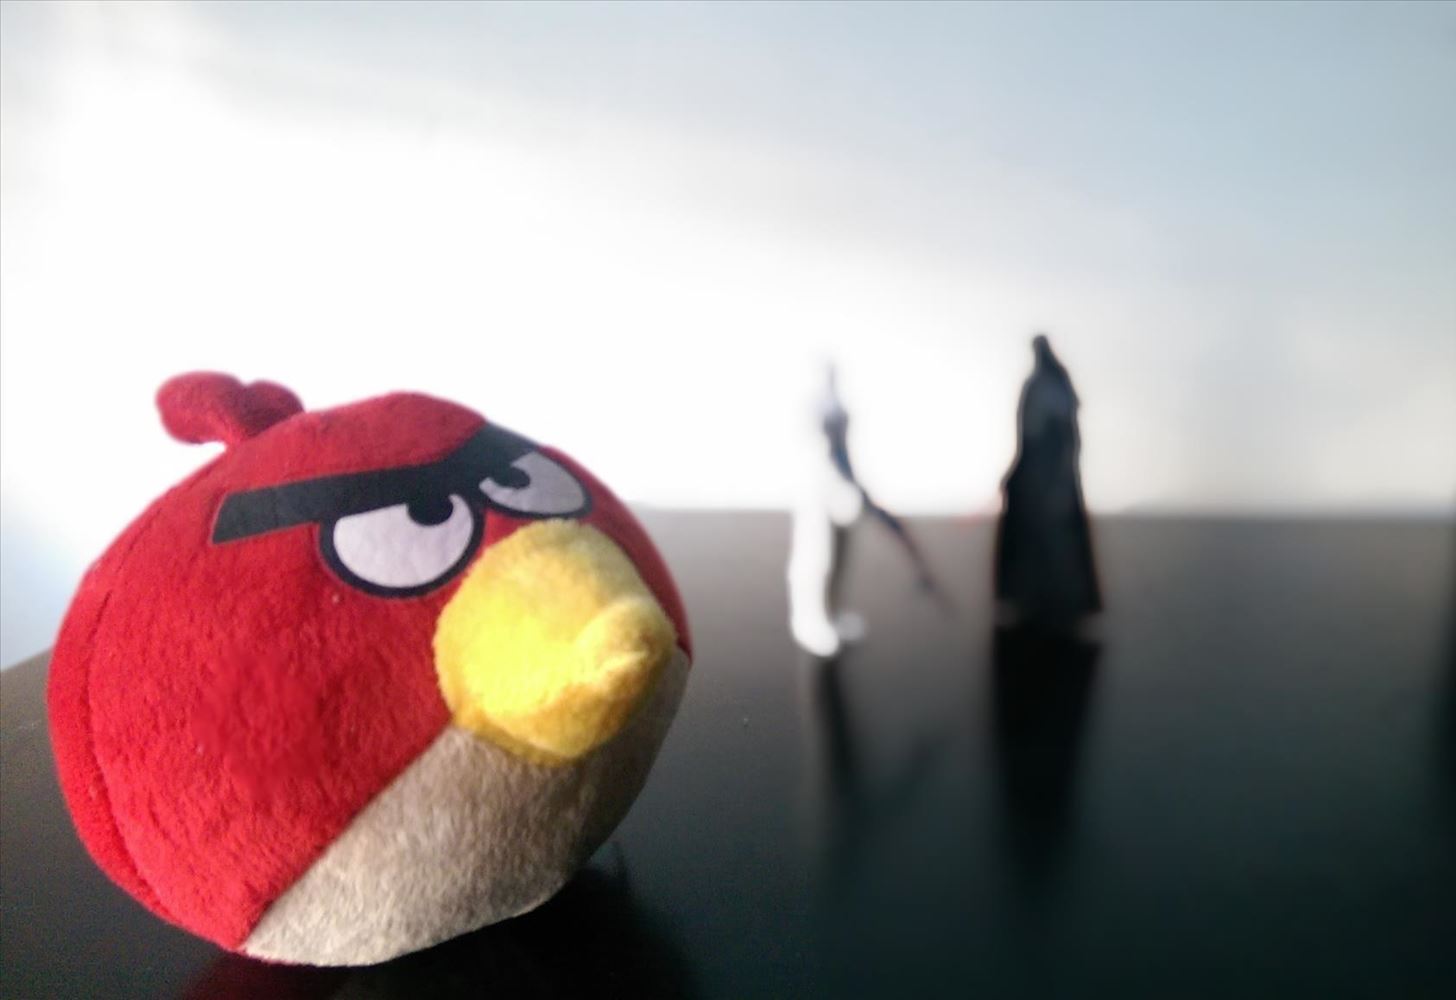
This is where that second lens around back comes into play. It's not actually a camera, but a sensor that records information about depth whenever you take a normal picture. This allows you to choose a point of focus in an image after you've taken a shot, with some interesting results.
When viewing a picture, after tapping Edit and Effects, tap UFocus. The device will prompt you to tap anywhere within the shot to refocus.
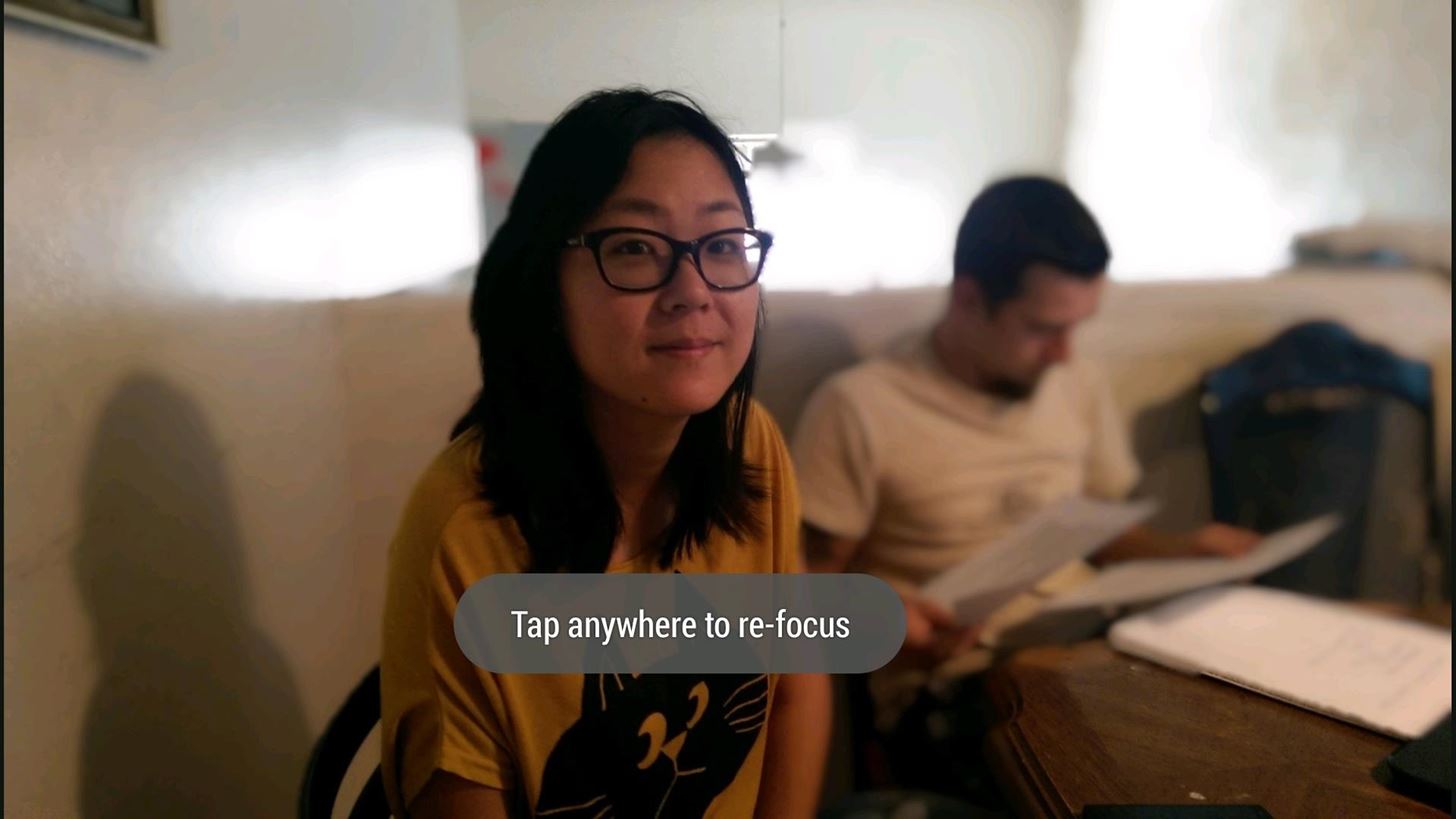
This is a cool feature for a few reasons. For one, this isn't just a blur tool, it's actual focal point manipulation. Over the years, improvement on smartphone cameras has centered around producing sharper, clearer images. For the most part, on smartphone cameras, "being in focus" is a matter of whether or not the shot is blurry.
The Duo Camera with UFocus allow you to make shots more dramatic, and produce images that aren't typical for a smartphone. You can create striking images by emphasizing subjects, or bringing background and foreground in and out of focus as if you were adjusting the aperture on your DSLR. Take a look at a couple examples below:


You can see just how well the camera differentiates between foreground and background—this is the sensor at work.


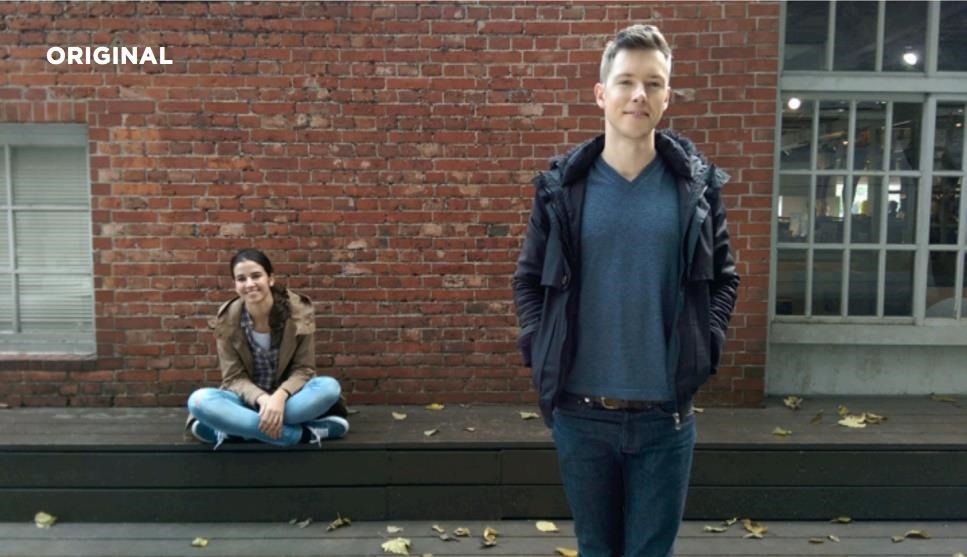
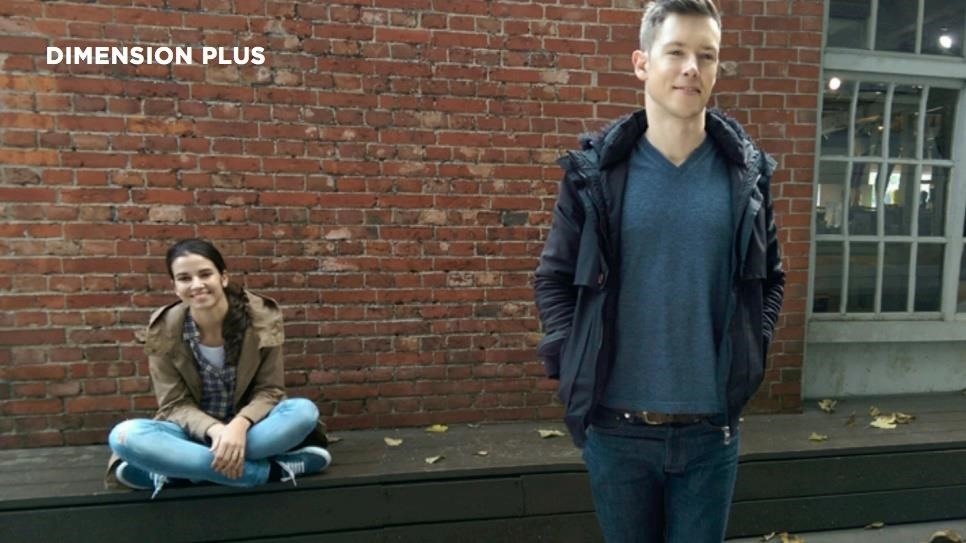
You can also use UFocus to change the perspective of an image by changing the focal point between subjects.
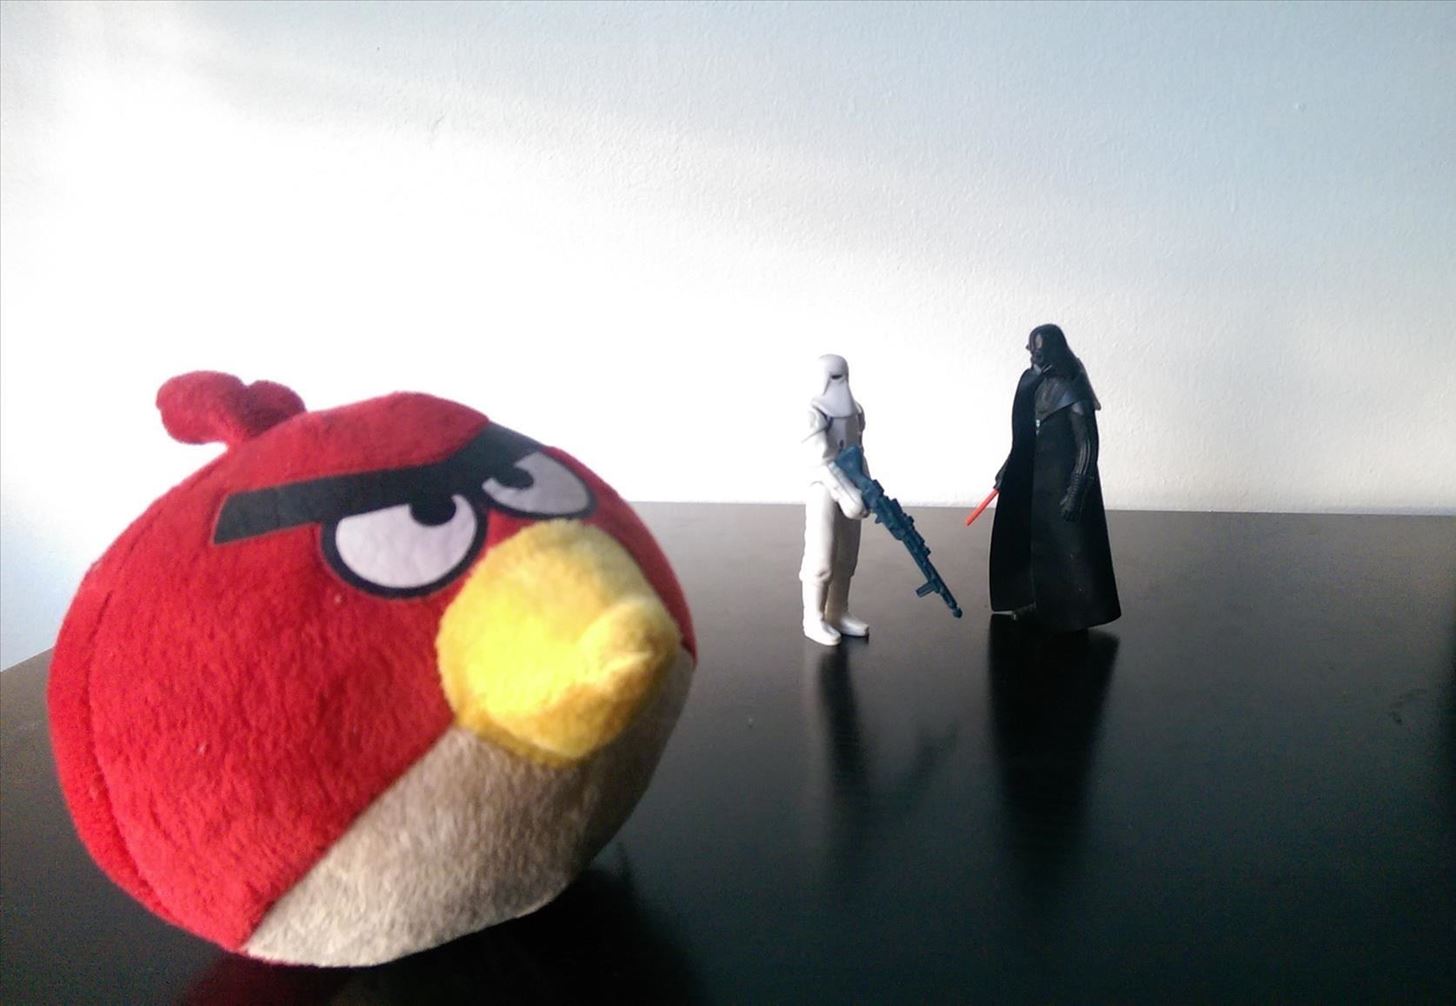

As you can see, there are some fun possibilities here.
#7. Using 3D Effects & Other Edits
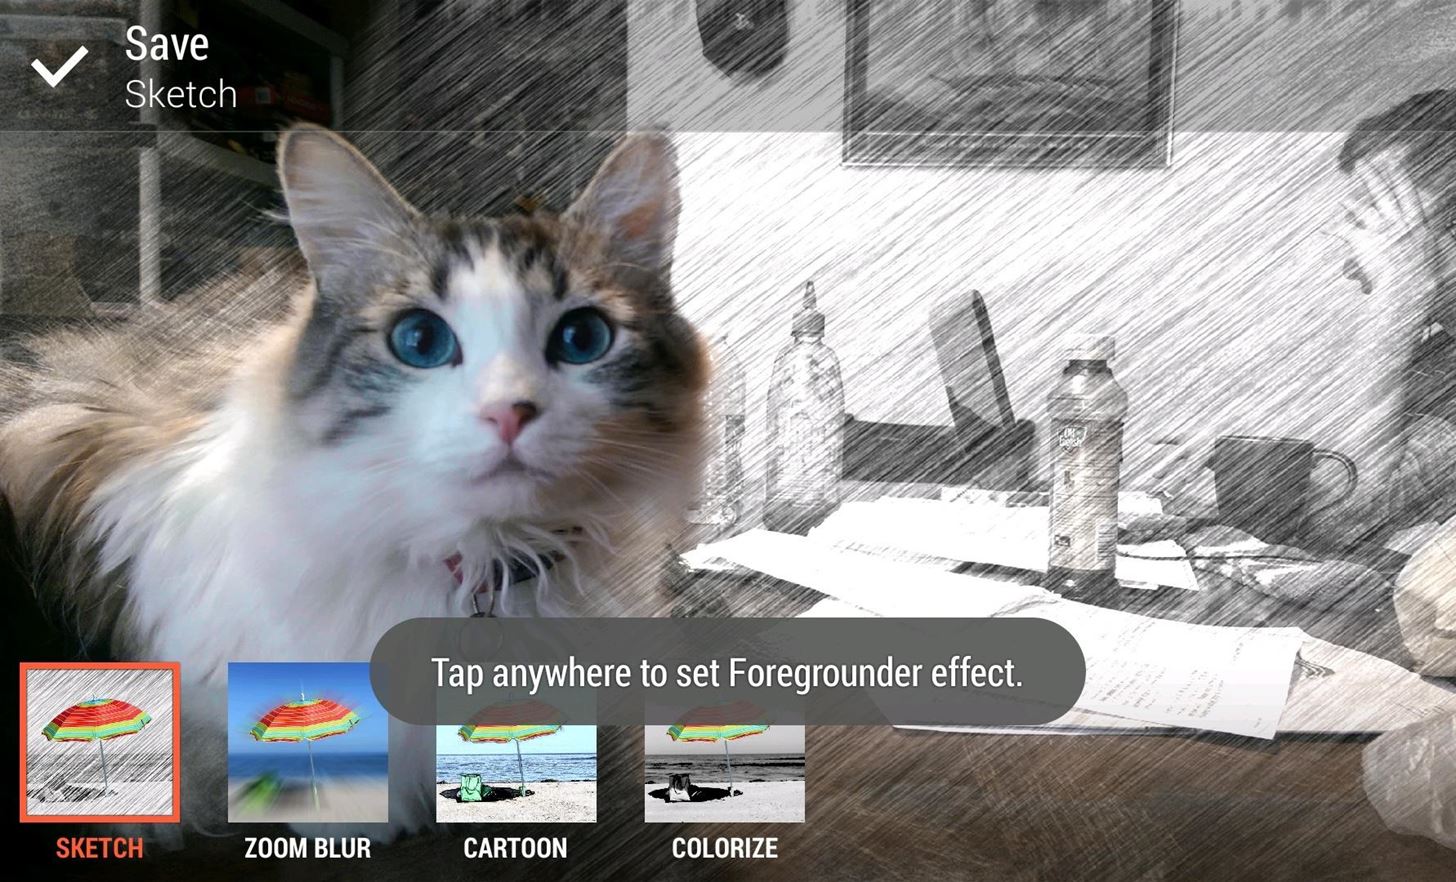
HTC included other effects that are fun to toy around with. After UFocus, you've got Foregrounder, Seasons, and Dimension Plus. Foregrounder uses the Duo camera similarly to UFocus, but rather than choose an area of focus, it applies an effects like Sketch, Zoom Blur, Cartoon, and Colorize. They're all solid choices and produce fun results.
Seasons applies a color pallet and a 3D effect like falling leaves or snow. It's interesting, but if you want to share it with someone, you're going to have to do it by showing them your device because, you can't export it outside of the Zoe app.
Dimension Plus is also limited to your screen. It applies a 3D effect to the image that you can observe if you tilt and move around the phone, similar to the Lens Blur feature. It's interesting to say the least, and it can be slightly disturbing, but it's worth a look.
Closing out the effects are Stickers, Copy & Paste, and Touch Up. If you're the kind of person that likes to slap on fedoras, mustaches, and corn cob pipes onto photos of your friends, Stickers is where you can do it.


Copy & Paste lets you pull your friends out of one image and drop them down in another. It only works if the software recognizes a face, and you'd be hard pressed to make the effect look decent, but it does work.
Finally, Touch Up allows you to make innocuous enough adjustments like Red Eye Remover, but it also gets into crazy Nintendo DS territory with Face Contouring and Eye Enhancing. It's silly stuff, but it doesn't hurt that it's there.
#8. Shooting Tips & Tricks
There's a lot your M8 shooter can do, so here are a few ways to snap the kind of shots that get you the Facebook likes you've been craving.
Go for the Shotgun
In camera mode with everything on auto, your M8 can take 12 shots in a single second, or just 1 shot in a tenth of a second. Some of the best photographers I've known have told me that their best pictures were the ones where they just got lucky; that they just happened to press the shutter button at the right time.
Take advantage of burst mode when you're shooting—hold down the shutter icon for a few seconds, and sort it all out later. You just may find that you accidentally took awesome shots at critical moments.
Own the Night
HTC's Ultrapixel design means that you'll take softer, less detailed photos in good lighting than other smartphones out there. But it also means that the M8 is the undisputed champion in poor lighting conditions. The M8 takes better pictures in low light than any other phone on the market, bar none.
Stay Focused
On most cameras, you can frame up your shot, hold down the shutter button to keep the focus and exposure settings, then move the camera before taking the shot without losing those settings. Smartphones are normally so aggressive with their auto focus, that if you move the phone at all, or just wait too long, it'll refocus.
The M8, like a lot of phones, lets you tap the screen to choose an area of focus, but if you long-press on the focal point, it will lock down the exposure and focus allowing you to move the phone before you take your shot.
This comes in handy if you liked the way the light looked when you were focused a few inches up on a white wall for example. Lock your exposure on the wall, move your phone, then take your original shot.
The Duo Advantage
UFocus might be a little gimmicky, and although the folks at Google recently figured out how to use accomplish similar effects with software trickery (Lens Blur), it's still nice to have. The best part about it is that, unlike with Google's Camera, you don't have to think about it until after the fact.
Just take pictures like you would normally, but every once in a while head back to the gallery, go to edit, and see if UFocus makes a positive impact. With a little experimentation, you could make a good shot even greater. Don't worry if you don't like it, because the gallery always saves the original image after the edit. UFocus is always there if you need it, and tucked away if you don't.
Videography
Never shoot a video with your phone in portrait orientation! It will be tempting because you normally hold your phone in portrait when you use it, but you should always record video in landscape. Otherwise when you display your video on a computer or TV screen, it's going to play back in a tiny vertical rectangle rather than stretch across the screen.
While recording a video, if you tap the flash icon in the top right corner of the screen, it will activate the LED which will stay on until you tap the icon again. Perfect for night shooting, or for ghost videos in haunted houses.
The M8, by default, shoots in full HD at 1080p at 30 frames per second, which is great. But it can also shoot in full HD at 60 FPS. While in video mode, tap the menu icon on the top right, tap the first icon down, then select FHD which stands for "Fast FullHD".
30 FPS should suit you because most movies and TV shows are shot in 30 FPS, but 60 FPS is faster which will result in a smoother video. The M8 uses the same bit rate to record both 30 FPS and 60 FPS, so you'll lose a little quality with 60. It's the kind of thing that you never need to mess with, but it's really cool HTC included it.
Cameras on smartphones are getting better every year, and in the race for the highest megapixel count, HTC did something different. These features demand experimentation, and are worth your time. Try them out, and let us know what the Duo lenses can do for you.
Just updated your iPhone? You'll find new emoji, enhanced security, podcast transcripts, Apple Cash virtual numbers, and other useful features. There are even new additions hidden within Safari. Find out what's new and changed on your iPhone with the iOS 17.4 update.


11 Comments
I cant get the camera to start using the motion gesture at all! Am I doing something wrong? Checked all my settings and they are all correct
Yeah, I know what you mean. It is a hit-or-miss with the camera gesture. I sometimes get it to work by holding the Volume Down button and then tilting the device towards and away from me.
The trick to making sure the motion guesture work almost everytime is the following:
When the phone is locked (no matter where it could be sitting) pick it up into portrait mode (like you would normally use the phone during a call) and then rotate the phone to where the volume adjust keys are facing upward. Press the volume key (does not matter which side you press) and then the phone will emit a small vibration as feedback to tell you the camera is starting.
If you follow that process like I do then you will be able to turn on the camera with the phone being locked in about 2-3 seconds depending on how well you can follow the above steps.
Good luck!
This is an A+ guide. I just learned so much about all the different things this phones camera can do. I was already really happy with the incredibly high resolution images and easy of use but now, I am just blown away. Thank you very much for the incredibly well written and useful post :)
The Zoe app is working on mine I think, I just got mine yesterday and it said "Coming Soon" but today it is running. The problem I do have is I can't find the "Auto Selfie" setting in settings I looked under camera options but I don't see it.
What version of Sense and Android are you running and when you go to camera options are you doing that while Selfie mode is active?
For some reason, mine doesn't let me edit one of my videos. It says "Unable to edit this type of file - Incompatible file." It's exactly the same type of file as every other video I've taken on the phone, It's an mp4. Why can I edit any other video and not this particular one?
The video may be corrupted. Try uploading it to your computer and then seeing if you can edit it on there.
plz gays tell me when i am clicking picture it always say duo camera is blocled and when i click any picture i go to effects the u focus or any other effects r not working its shows either (unavailable hand cover photo or duo effect unavailable for this picture) plz plz help me out of it?
Have you tried cleaning the Duo lens?
My selfie mode is not showing in my camera so please help me
Share Your Thoughts